
This is a detailed post in which i will try to teach you how to add extra columns to your blogger template. It is very easy but for this you must know a little about HTML. Follow my steps and try and please give your feedback. If required any further information, feel free to ask.
Step #1
First of all go to the HTML editor of your blogger template. Do not click "Expand Widgets"
Search for :
<body>
Now the actual works starts from here.
Adding New Widget Section In The Header Area

Now search for
<div id='headerbg'>
in some cases you might search for this
<div id='header-wrapper'>
Here is the code for the new Widget Section:
<b:if cond='data:blog.url == data:blog.homepageUrl'><b:section class='sidebar' id='magazine-left' showaddelement='yes' > <b:widget id='Text51' locked='false' title='Test Title 1' type='Text'/> </b:section> </b:if>
You have to change the Orange text if you want to use this code again and again in your template. You can write anything. This widget will be shown only in home page. If you want it on every page, than use this code
<b:section class='sidebar' id='magazine-left' showaddelement='yes' > <b:widget id='Text51' locked='false' title='Test Title 1' type='Text'/> </b:section>
Now here is where to add the above code

OR

Now here is the Change

The easy way to find where to add the widget is that search for the existing widget. For example, i gave a title " Delete this element" to a widget. Now if i want to put a new widget section above it, than simply search for " Delete this element " and paste the code above it.

How to Add new widget Section above the blog Posts :
Search for
<b:widget id='Blog1' locked='true' title='Blog Posts' type='Blog'/>
Remember you cannot add a section in between the previous section. Just like this

Now if you want new widgets above the Blog Posts, than add the code above the code shown in the picture. If you want below the post, than simply add the code below.
Note: Your code might be some different, so you have to look yourself. Only thing to remember is that you have to put your new code before <b:section or after </b:section> not in between.
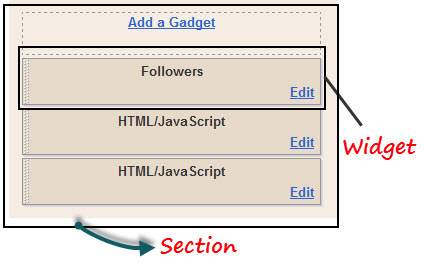
How To Add A New Widget In The Sidebar
To add new widget section in the sidebar, simply do the easy work as i mentioned above. Search for the existing widget and choose where to add, BELOW or ABOVE. Just like this.

In my case, i will search for " Follow me "

Now add the code above or below the entire section.
Just like this, you can add new widgets on any place in your template. Simply add a new widget, give a title to it and than search for that title in HTML editor and place the new code Above or Below. Its Simple. But remember, add the code before the opening section or after the closing section.
If you want to add Two columns at a time just like the one below

Than simply follow these steps. The steps are same just one step will be added.
Use this code instead of the one above
<b:if cond='data:blog.url == data:blog.homepageUrl'>
<b:section class='sidebar' id='magazine-left' showaddelement='yes' >
<b:widget id='Text51' locked='false' title='Test Title 1' type='Text'/>
</b:section>
<b:section class='sidebar' id='magazine-right' showaddelement='yes' >
<b:widget id='Text52' locked='false' title='Test Title 2' type='Text'/>
</b:section>
<div style="clear: both;"></div>
</b:if>
If you want to show this widget section on every page than use this
<b:section class='sidebar' id='magazine-left' showaddelement='yes' >
<b:widget id='Text51' locked='false' title='Test Title 1' type='Text'/>
</b:section>
<b:section class='sidebar' id='magazine-right' showaddelement='yes' >
<b:widget id='Text52' locked='false' title='Test Title 2' type='Text'/>
</b:section>
<div style="clear: both;"></div>
Search for </b:skin> and add this code above it
#magazine-left {
width: 45%;
float: left;
}
#magazine-right {
width: 45%;
float: right;
}
Note: If you want to use this code again and again than simply just change the text in Orange. The Orange text in first and second part of code should be similar.
If have any questions, than ask. Would love to help.