
Navigation menus play a huge role in search engine optimization of a blog. Linking blog articles directly to the root of the blog makes those articles jump higher in SERP (Search engine results page) as that allows us to flow the page rank juice to those linked posts.
So once you work hard and achieve higher page rank, you could then utilize them by linking your top-notch articles with the main domain of the blog. That could either be done via featured post widgets or simply through drop down menus that provide an instant outlook of the content that your blog could provide.
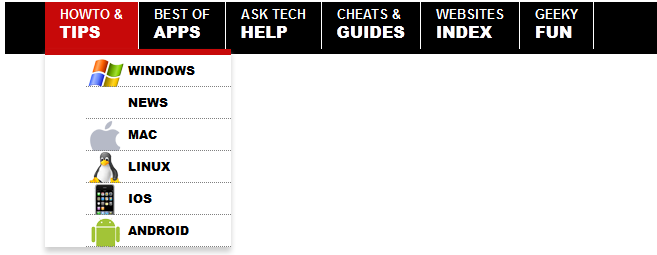
We have shared a couple of drop down menus before and here we have today yet another elegant one (probably the best one that we have shared before). The premium feature that allows you to add logos beside the link is simply amazing.
Step #1 Customize the Navigation Menu Code
<!--BeH navigation Menu-->
<div class="header-container">
<nav id="navigation" class="container">
<ul>
<li class="subnav main on">
<a href="http://www.bloggingehow.com/">
<span class="top">Howto &</span>
Tips
</a>
<ul class="headermenu2column">
<li class="sprite windows">
<a href="Link 1">Windows</a>
</li>
<li class="menu-text">
<a href="Link 2">News</a>
</li>
<li class="sprite mac">
<a href="Link 3">Mac</a>
</li>
<li class="sprite linux">
<a href="Link 5">Linux</a>
</li>
<li class="sprite ios">
<a href="Link 6">iOS</a>
</li>
<li class="sprite android">
<a href="Link 7">Android</a>
</li>
</ul>
</li>
<li class="subnav bestof">
<a href="Category Title Link">
<span class="top">Best Of</span>
APPS
</a>
<ul>
<li class="">
<a href="Link 8">Best Websites</a>
</li>
</ul>
</li>
<li class="subnav answers">
<a href="Link 9">
<span class="top">Ask Tech</span>
Help
</a>
<ul>
<li class="">
<a href="Link 10">Windows Tips</a>
</li>
</ul>
</li>
<li class="subnav guides">
<a href="Link 11">
<span class="top">Cheats &</span>
Guides
</a>
<ul>
<li>
<a href="Link 12">MakeUseOf Guides</a>
</li>
<li class="last">
<a href="Link13">MakeUseOf Cheat Sheets</a>
</li>
</ul>
</li>
<li class="subnav dir">
<a href="Link 14">
<span class="top">Websites</span>
Index
</a>
</li>
<li class="subnav gf">
<a href="Link 15">
<span class="top">Geeky</span>
Fun
</a>
<ul>
<li>
<a href="Link 16">Funny Pictures</a>
</li>
<li>
<a href="Link 17">Funny Videos</a>
</li>
<li class="last">
<a href="Link18">Most Commented</a>
</li>
</ul>
</li>
</ul>
</nav>
</div>
<style>
#navigation {
height: 52px;
width: 960px;
}
#navigation li {
float: left;
height: 47px;
}
#navigation ul li a {
border-right: 1px solid #FFFFFF;
color: #FFFFFF;
cursor: pointer;
display: block;
font-family: "Arial Black",Arial;
font-size: 16px;
font-weight: 900;
height: 39px;
padding: 4px 15px;
text-decoration: none;
text-transform: uppercase;
}
#navigation .last a {
border-right: 0 none;
}
#navigation a span {
display: block;
font-family: Arial;
font-size: 13px;
font-weight: bold;
}
#navigation li ul {
background: none repeat scroll 0 0 #FFFFFF;
border-top: 6px solid #C70909;
box-shadow: 0 5px 5px #CCCCCC;
position: absolute;
visibility: hidden;
}
#navigation li.subnav:hover, #navigation li.subnav.hover, #navigation li.subnav li:hover, #navigation li.subnav li.hover {
background-color: #C70909;
}
#navigation li:hover, #navigation li.hover, #navigation li.on {
border-bottom: 5px solid #C70909;
cursor: pointer;
position: relative;
}
#navigation li:hover ul, #navigation li.hover ul {
visibility: visible;
z-index: 99;
}
#navigation li ul li, #navigation li ul li a {
border-right: 0 none;
color: #000000;
float: none;
font-family: "Arial Black",Arial;
font-size: 12px;
font-weight: 900;
height: auto;
padding: 0;
white-space: nowrap;
}
#navigation li ul li:hover, #navigation li ul li.hover, #navigation li ul li a:hover {
}
#navigation li ul li.last {
border-bottom: 6px solid #C70909;
padding-bottom: 9px;
}
#navigation li ul li.last, #navigation li ul li.no-bg {
background-image: none;
}
#navigation li ul li, #navigation li ul li:hover {
border-bottom: 1px dotted gray;
padding-left: 18px;
padding-right: 16px;
}
#navigation li ul li a {
padding: 8px 20px 8px 25px;
}
#navigation li ul li a {
background-position: left top;
}
#navigation li ul li:hover {
background-color: #C70909;
color: white;
}
#navigation li ul li:hover a {
color: white;
}
#navigation li.subnav li.sprite {
background: url("http://1.bp.blogspot.com/-qUXk2YgkkYY/UFIsWGCC4vI/AAAAAAAAGVE/EfA2NuBFIPU/s1600/menu-sprites.png") no-repeat scroll left top transparent !important;
}
#navigation li.subnav li.sprite:hover {
background-color: #C70909 !important;
}
#navigation li.subnav li.sprite.windows {
background-position: 0 0 !important;
}
#navigation li.subnav li.sprite.mac {
background-position: 0 -40px !important;
}
#navigation li.subnav li.sprite.linux {
background-position: 0 -80px !important;
}
#navigation li.subnav li.sprite.ios {
background-position: 0 -120px !important;
}
#navigation li.subnav li.sprite.android {
background-position: 0 -160px !important;
}
.container {
margin: 0 auto;
width: 960px;
}
.header-container {
background: none repeat scroll 0 0 #000000;
}
ol, ul {
list-style: none outside none;
}
</style>
How To Implement The Code?
Edit the highlighted tags in the code above. Once done, simply follow the steps below to add the navigation menu to your blog. Navigate towards to Blogger Dashboard >> Layout >> Add a Gadget. Add the gadget called HTML/JavaScript and paste the following code in it. Thats all.
Hope that was helpful and in case of any help that you need, simply leave out a comment below and i would get back as soon as possible.