
The most effective and easiest way to bring out your voice via a solid platform is to build your own blog in the niche that you love and a self-hosted WordPress blog can do it perfectly.
While you may achieve this by using free hosted options like Blogger.com, WordPress.com, or TypePad.com, you won't be getting any solid controls like as you would get in a Self-Hosted WordPress blog.
This is what I use for my sub-domains here at BloggingEhow.com and that's mostly what Pros and serious bloggers do out there making self-hosted WordPress option the best in the industry.
BUT that's where most of the beginners get stuck up. They believe it to be tiresome and complex stuff to set up their very own self-hosted WordPress blog and we are here to help you and other newbies at creating a blog with WordPress.
The post explains:
1- Steps to set up your self-hosted WordPress blog
2- Install and activate an attractive WordPress theme
3- Publish your very first blog post for the world to see!
If you feel that the guide would help any of your friends too, please pass on the link to this post.
So lets start of!
#1 PICK FOR WORDPRESS HOSTING
Get Bluehost web hosting for only $3.95 a month with one free .com domain name by WordPress Recommended Company, that I use for BloggingEhow too.
Yes, this is an affiliate link, which means I earn a commission if you signup using this link, at no extra cost to you.
Step #1 Gather Your Resources
First gather your resources that you would be required in the process to setup a self hosted WordPress blog.
- A Domain Name Idea for Your New Blog
- A Credit Card (debit card and Paypal will work too)
- 8 Minutes to Spare
By the way, its better if you haven't already registered the domain name for your self before, as in this self-hosted WordPress blog guide, we'll go through that entire process step-by-step where you will get a FREE domain name, get a cheap hosting for your blog (with the service that ill recommend in the next step) and finally launch your first blog post.
How To Find A Domain Name?
It looks like a pro's only thing and it is hard when you are newbie and don't know niches, industries, market trends and monetization of your blog. For such case, I have a list of some simple methods to choose or find a perfect blog name idea for registering your first domain name:
- Register a .com with your name
- Consider asking for suggestions to your friends and family
- Look at the things around yourself, find names there
- Brainstorm and find your favorite words, match them
This is your first blog, so I suggest you start it with a domain name like yourname.com or your petname.net and also try to make it catchy, memorable, and short.
Exiting right? 🙂
Though if you have already registered the domain or not, I'll explain the process to proceed with that in the next step and this guide will give you a free domain name registration possibility too.
How to Host A Blog?
Hosting a blog or as we say, self-hosted wordpress blog is like making a structure on a land that starts from the grounds and then grows brick by brick and if your hosting is not reliable, you will have a tough time when you will start receiving huge traffic. This is a brick that will help you build your blog as big as you want it to be.
For hosting a blog, all you have to do is just buy a web-hosting plan from a reputed hosting company and then connect your domain or they will do it automatically and give you the one-click wordpress install option for making your blog go live in a few minutes.
I recommend you to go with BlueHost for this.
Why BlueHost?
Hosting is basically a remote computer (server that you rent) where your blog would 'live'. All the blog files, blog posts, images that you would use on the blog etc would be laying on Internet.
This is where you would install your WordPress software and manage your blog.
Its easy as a pie. Though sounds complex 😛
There are tons of Hosting services out there (hundreds and may be thousands) out there that offer hosting services. Though not every one of them is worth using for your valuable blog.

MONEY BACK GUARANTEE
If you're not satisfied with Bluehost, they'll give you your money back. No questions asked, no time limits. Cancel at any time, and they'll issue you a refund for the remainder of your current payment term. It's like a warranty that never expires! Plus, during the first 30 days, they'll refund your hosting fees in full.
However, based on my experience and the research, for a self-hosted WordPress blog I recommend BlueHost to be the best of them all due to the following reasons:
Reasons #1 Support
BlueHost has a great 24-7 support via phone, chat and email. I have personally used in couple of times and the folks there are really courteous, spontaneous and helpful at the same time.
Reason #2 Reliability
BlueHost is powered by extremely reliable servers that provide an amazing uptime of 99.9%. It's better than tons of crappy services out there.
Reason# 3 Super Easy to Use
BlueHost is tailored for non-geeks. Over the years, BlueHost team has worked hard to make it easy to use so that anyone with zero tech knowledge finds it easy to get through.
Reason# 4 WordPress Recommended Hosting
Interestingly, WordPress officially list BlueHost as the top hosting service (among the 3 they promote them selves). BlueHost hosts over 850,000 WordPress blogs.
Reason #5 No Limits (Unlimited)
BlueHost offers unlimited disk space, unlimited bandwidth, unlimited domains (i.e., you can host multiple blogs or sites on one account), and unlimited e-mail accounts. It cant get any better. 🙂
Reason #6 Affordability
BlueHost is inexpensive. Starting from $3.95 to $5.95 a month, depending on which plan you select. Interestingly, the longer you're willing to commit your hosting, the cheaper it becomes.
Note: BlueHost is now offering a special for $3.95 a month. This is honestly a steal. Get it while you can. But be sure to use one of the links in this post to get this special offer.
Reason #7 Values
Values mean a lot to me. BlueHost doesn't allow as per its terms of service (see Section 10.03) to host any pornographic, nude content on its servers.
Honestly, i would not be wanting my blog to be hosted on the same servers as some other pornographer.
If your thoughts are somewhat similar, you would be shocked to know that almost every other hosting service allows such unethical content to be hosted on their servers.
You may want to NOTE that i am a BlueHost affiliate. That means that i get a commission every time i get a sale through my links.
But that doesn't make me promote another hosting service due to the fact that I honestly believe that BlueHost is the only hosting service out there that my inner person feels comfortable promoting.
There is always something with other hosting providers that gets to a no-no point. BlueHost is all the way for me and hopefully for you too.
You should also know that my blog bloggingehow.com isn't hosted on BlueHost entirely. Our sub domains are hosted on BlueHost servers where are the main blog is on Blogger platform (and thus hosted on blogspot servers).
BlueHost specializes in shared servers and it is the right choice for 95% of bloggers.
By the way, BlueHost offers 30 Day money back guarantee that you can call for any time after purchase in case you're not satisfied with the service. I am sure there are very little people out there who would come to this point of refund.
Once you're in, you'll get addicted to the service its self as I am.
Step #2 Buy Web-Hosting and Domain Name
Okeh, so if you're still with me, go to BlueHost homepage and click the 'Get Started Now' button.

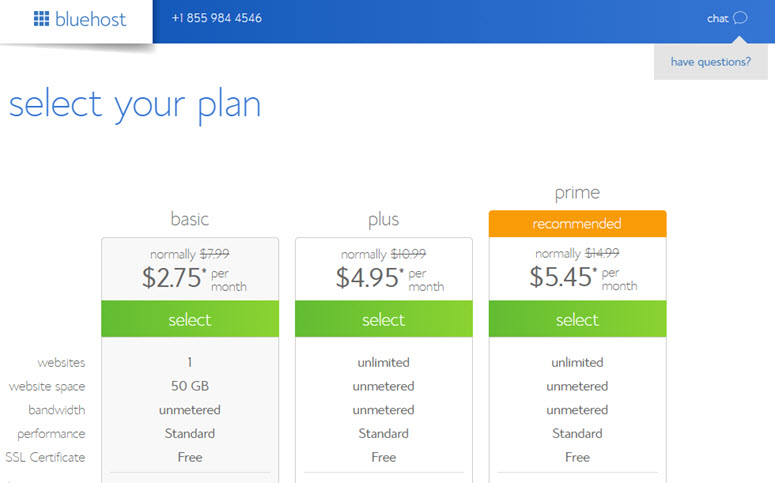
After clicking the 'get started now' button, you'll be 3 plans to choose from. Simply close your eyes and go for the cheapest one that is "Starter' plan. Starter plan is more than enough for a normal websites/blog requirements.
2.1 Choose A Plan
Click 'select' on starter plan. (You can always switch your plans later if you need.)
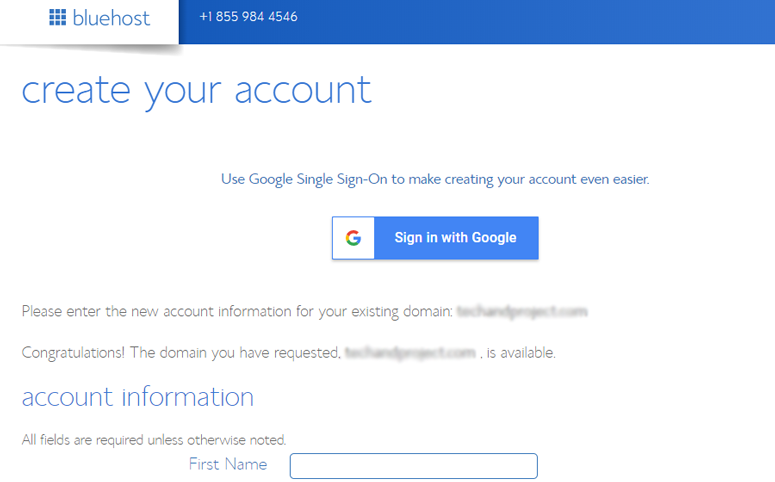
Now here, you have to decide whether you have already bought (registered) a domain name before with any other registrar (example Godady.com etc) or you have to buy one right now if you haven't already.
2.2 Type Your Domain Name
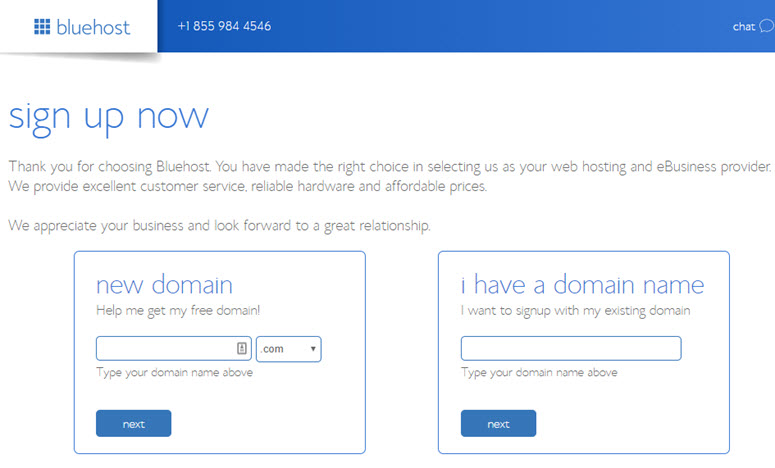
I would assume that you are all the way new person to start of, so you have to get a domain name for the first time. (In case you have already bought one before, ill explain at the end of the post how exactly you have to proceed).
Now you'll be taken to a form where you have to enter your account information like name, address, phone number etc.
2.3 Create Web-host Account
Here you have to select the package that you want to get for your hosting. BlueHost offers $3.95 to $6.95 per month. Though you can get an amazing discount at 3.95$ per month if you get it through one of the links in this post.
Note: BlueHost is now offering a special for $3.95 a month. This is honestly a steal. Get it while you can. But be sure to use one of the links in this post to get this special offer.
You have to keep in mind that these prices are at annual rates so you have to pay in advance for the 12 months, 24 or 36 months, depending upon your package.
This is the very way BlueHost is able to offer such low prices for their clients. 3.95$ per month is more of a steal offer 🙂
Now once all the form is done, i would not personally sign up for any other services promoted at the bottom of the form. But that's up to you. Uncheck them all as shown in the image below.
2.4 Buy Hosting + Domain

Nowenter your billing information and hit check box to confirm terms of service and hit Next. Now it will confirm your credit card information
BlueHost will next ask you to “Select the Upgrades that Best Suit Your Needs.” I would skip all of these. Click the Complete button at the bottom of the page. You'll be taken to the installation page as shown below.
Step# 3 Install WordPress
I am glad that you've made up till here. Don't get knocked down by the geeky feel of it. Trust me its easier than you would have ever thought. Unlike before, BlueHost has made it far easier (a matter of few clicks) to install WordPress so that any non-techy person can do this.
3.1 Choose a free WordPress Theme
After you choose a plan, you will promptly redirect to the WordPress installation page, here you can choose a theme for your new WordPress blog:
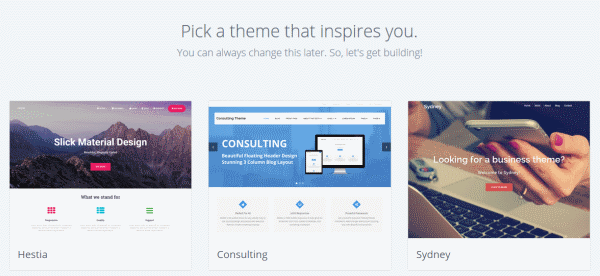
NOTE: You can always go for a Premium WordPress Theme to make sure there's no glitch in your website and every visitor is loving your website design.
3.2 Add Name and Tagline
Now after choosing a theme for your new blog, you will be asked to add a Site Name and a Site Tagline that will represent your blog at the online world:
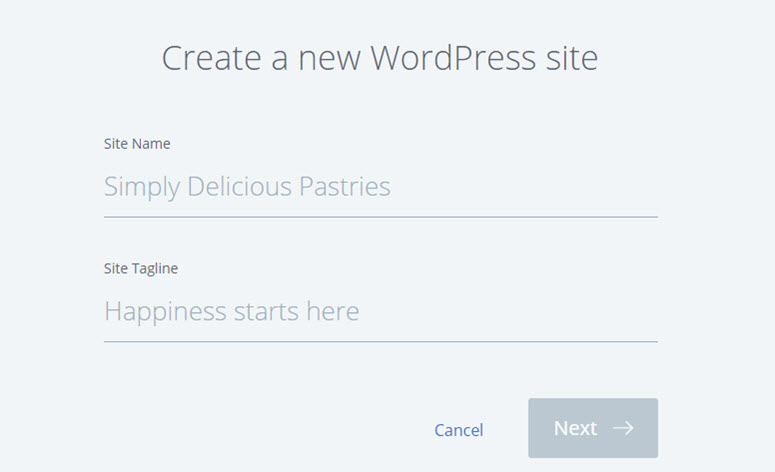
After adding name and tagline, hit the Next button.
3.4 Complete Installation
As soon as you hit the Next button, your WordPress blog will be auto-installed in your Bluehost hosting cpanel and everything will be ready for you:
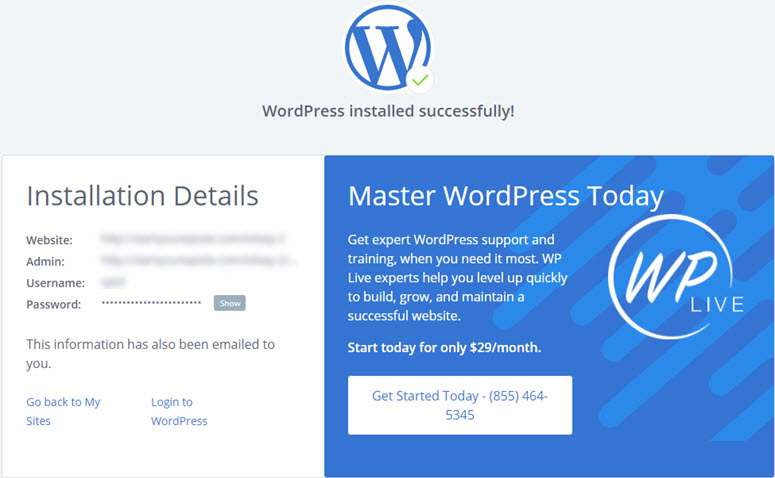
Now you can see your blog live and its dashboard at wp-admin section by visiting it as http://yourblog.com/wp-admin or simply by clicking on Login to WordPress as you can see in the above screenshot.
3.5 Login To Your WordPress Dashboard
As soon as you are on the wp-admin section of your blog, you will see a screen like below:
Now simply login with the details that Bluehost has sent to your email address (that you used to signup with Bluehost) and see what's inside your new WordPress blog.
BlueHost will also e-mail this information to you, but its better to have a backup. I would write it down or take a screenshot.
That's a great progress that you have made up till here. Things will get much faster from here on as you have almost made it.
At this point, your blog is already created and is live on the Internet for people to see. Though as you haven't published a post/article yet, there is nothing fancy to see there. 🙂 WordPress uses a generic template when you install it for the first time.
You can later on choose tons of great template from. I'll talk about that in next step.
Step# 4 Load your new blog (just to get excited)
You can load your blog by clicking your blog URL and notice the blog live if you wish.
This will be a winning moment when you will see your own blog created by your own hands without any kind of help. That's you, you did it.
Step# 5 Install Essential Plugins
After installing WordPress and selecting a theme, its time to install and activate some of the essential WordPress plugins and its really simple.
All you have to do is just go to your blog's dashboard and navigate to Plugins from the left menu of WordPress dashboard and then click on Add New, here you will see many plugins that are popular in WordPress plugins directory.
There will be a search bar for searching other plugins and you have to type names of below plugins then Install and Activate them respectivelly:
- Akismet Anti-Spam
- Contact Form 7
- RankMath
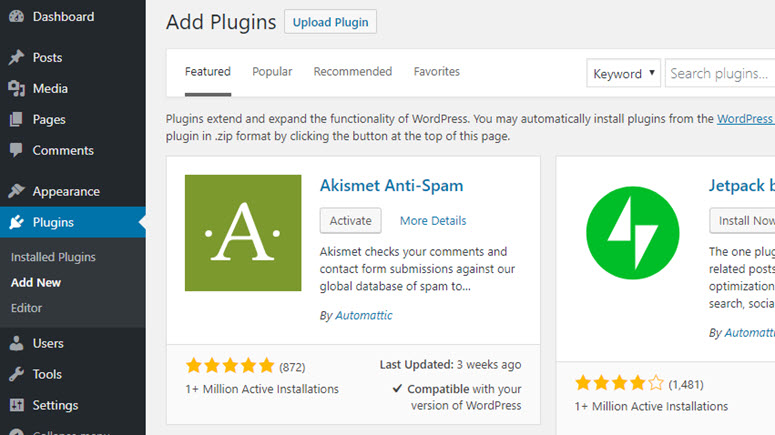
Its fun!
There are hundreds of free WordPress plugins in this section of WordPress CMS and you can find and install/activate them for testing how things work at WordPress.
Step #6 Write and Publish Your First Blog Post

Click Posts | Add New while you're in WordPress dashboard. That would take you to 'Add New Post" screen as shown in the image above. This is where you would be typing in all those words for your first WordPress blog post.
In the Title Name field, give some interesting post title that would grab your readers attention.

Next, write down your post body in the main section as shown below.

That's it! Now you simply have to 'Publish' the post for the world to see. To do that, simply hit the publish button on the right as shown in the image below.

Congratulations! You have just published your first post on your very own self-hosted WordPress blog.
Step #7 Bookmark Your Blog For Future Reference
Now that you're aware of your blog's URL and the dashboard (backed), its always a wise approach to bookmark them so that its easy for you to come back to your blog or the dashboard with a single click.
In case you accidental forgets the link to WordPress back end dashboard, you can simply access it using:
http://[Your blog name here]/wp-admin.
If you followed everything that I went through in this guide, you now have your very own self hosted WordPress blog. Cool huh?
More Help?
In case you need any other information regarding your newly born WordPress blog or about your BlueHost hosting, you can consult with me using contact us page and I will be there for you.
After launching your wordpress selfhosted blog, you can spend your entire day learning more about this amazing and powerful blogging platform with its market of plugins and themes.
In case you know someone else who could get benefit from this information, kindly pass on the link to this post. Also, feel free to embed this screen cast in your blog posts. You can get the video from YouTube, as well as from Vimeo.
What If You Already Have a Domain Name?
That is not much of a deal either. If you already own a domain name with anyother domain registrar before setting up an hosting account with BlueHost, you can still proceed with the steps mentioned above.
All you need to do is to point your domain's 'NameServers' to BlueHost's Name servers. Below is how you can do that.
Step a: Login to your Domain registrar.
I'll put down an example of my local domain registrar i.e HostnDomain.com.
You have to simply go to your domain control panel and find an option saying 'Name Servers'.

You have to enter 2 NS Records (each at a time) as mentioned below.
ns1.bluehost.com
ns2.bluehost.com
Click Ok/Save and logout.
It usually takes a few hours (24-48 hours) for the process to complete. You might get lucky and it gets activated even within a few hours.
The rest of the process is the same. You have to follow Step #2 from here on. Rest is all same. In step#2, intead for opting for "i need a domain name", you have to enter your already existing domain name in the box as shown in the image below.

Hit Next and rest is all the same after step#2. Best of luck.! Do let me know in case of any problem that you might face.
Any Questions?
Do let me know in case of any problem that you might face. Leave out your queries in the comment section below and ill get back to you as soon as possible.